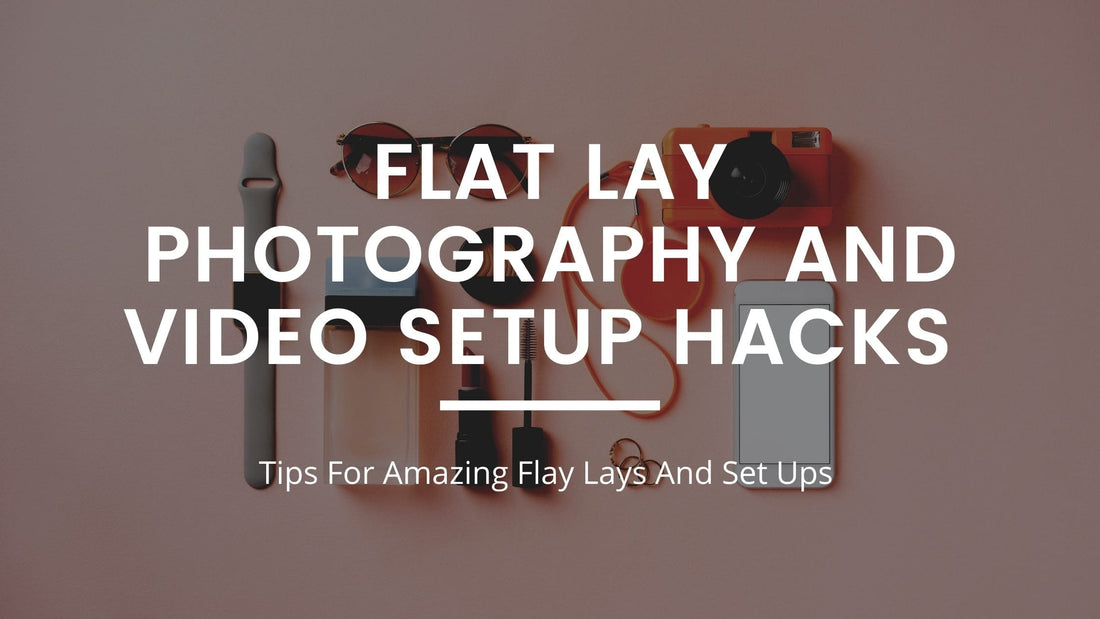
Unless you are new to social media and the internet, you have probably been seeing a horde of flat lay photography on Instagram feeds and gracing blogs daily. Flat lay photos and videos have never been more popular, especially regarding fashion and food. It is a fun way to showcase anything from your cute little plant to your latest cup of tea.
Flat lay shots provide us an excellent opportunity for storytelling, not only about the product(s) in the frame but also about your brand as a whole, to establish a meaningful connection with your valuable customers. Do you want to produce some awe-inspiring, evocative, and stunning flat lays? Then this is your go-to guide on flat lay photography and video setup ideas.
What is Flat Lay Photography?
A flat lay is a product photo or video taken from the top on a flat surface. The primary advantage of flat lay shots is that since they’re taken from a bird’s eye view, the pictures will appear clearly, without any distractions.
This unique top-down perspective of beautiful objects is carefully laid out on a flat surface in an aesthetically pleasing way that’s incredibly soothing to the eyes.
It is a category of still life photography that’s become super popular on blogs and social media platforms, allowing you to show off everything from food photography and your camera accessories to a layout of your makeup stash and your clothing – the possibilities are just endless.
Creative Setup Ideas for Flat Lay Photography and Video Shoots
Don’t you just love and admire viewing those lush flat lay photos on the internet and social media? If you also want to achieve the same level of pro look but don’t know how or where to start, don’t worry. We’ve got you covered.
The flat lay photography styling technique is usually built around a narrative. You should think of your flat lay shots as your story, which will eventually help you bring in your supporting elements.
After defining the textures, materials, and colors you want, this is where all the fun begins, and you can start arranging. So, if you want to up your flat-level photography game and snap some impressive photos, check out these fantastic flat lay photos and video setup ideas.
1. Choose your story
Choose a story you wish to tell your audience, and you can instantly elevate a couple of simple snaps of objects to a highly engaging and admirable image. Suppose you want to create a flat lay about a delicious new gourmet recipe you’ve tried: creamy lemon garlic chicken.
So, think of all the different ingredients you got from the store to prepare this scrumptious date night meal for two.

Adding a slice of lemon or one whole lemon, a few garlic cloves scattered here and there, spinach leaves, and spices like salt and pepper alongside in the frame with your meal communicates more of an engaging story as to all the things that went behind preparing this meal.
2. Find your star item.
The star item is the central point of focus of your flat lay image. Use this as your starting point to craft a unique story and composition. Your star item should usually be the largest in your entire frame, and you wouldn’t want to upstage or dominate it with anything else. The star item is the most significant product in the frame where you want to direct everyone’s eyes to go.
3. Composition
With flat lay shooting, you have total control over your compositions and framework. Arranging your stuff in a visually appealing way is probably the most essential flat lay skill one can champion.
How you bring your items together can confuse or compliment the simplicity of your style of photography. Each of your objects should have their own space as though this is how it was meant to be.
4. Add supporting colors, textures, and props.
Inject some personality into your flat lay images with texture and props. For instance, if you are into food photography, you can mix your dishes with an array of herbs and foliage, kitchen utensils, and magazines or books.
Or, if you want to create a flat lay on your latest shopping haul, you can add in your shoebox, probably get a glimpse of a shopping bag or two in the frame and throw in some confetti or anything with a pop of color to make it look more happening.
A lot of details can also be added to your flat lays via texture. In contrast, you can focus on specific color schemes or create an entire scene based on a particular mood.
In general, you can use props to make your flat lay photos and videos look more fantastic. Tall objects that generally look interesting from sideways do not serve as good props for flat lays. However, if you need to use tall props, try lifting and tilting them towards your camera lens. This aids with distortion and perspective.
5. Utilize negative spacing and avoid overcrowding your image.
While shooting for your flat lay photos, it’s essential to seek the right balance between a crowded scene and a minimalist scene. People make a common mistake by adding too many things that do not need to be there or leaving excessive empty space.
A term known as negative space refers to the space you see between the objects on your flat lay surface or background. Use this negative space to prevent your flat lays from appearing too busy or cluttered. You can use negative space to create some drama in the overall composition of the frame.
The thought of using all your props can be exciting. But, you should understand each prop needs to have a purpose, and they shouldn’t take away from your main subject. It is easier to start off with many items and then get rid of them one by one to give a minimalist, clean look to the remaining items.
6. Use a suitable backdrop.
A flat lay background looks best when it is of a solid color. Plain white and other solid colors always look fantastic. Still, you have plenty of great options to choose from, including patterned backdrops such as concrete, marble, grids, checkered, tiles, or wood. If you want to make your flat lay photos more organic, go for patterned or textured backdrops.
7. Explore common layout shapes
Shapes naturally tend to direct our eyes, so it is essential to place all your supporting objects in a way that replicates the shapes we see daily. For instance, you should consider using these layouts as your starting point:
● Parallel lines flat lay
In this layout, you basically line up all your objects parallel to both sides of your frame and then square them up.

● C-shaped flat lay
Start by positioning your largest items in a formation resembling a “C.” Clustering your items slightly and leaving some uneven spaces between the objects is most visually pleasing and gives you additional room for probs.

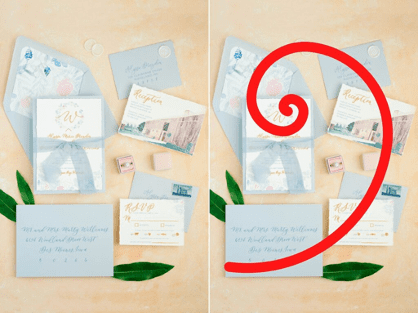
● S-curve flat lay
By using the “S” shape while styling paper items, your photos will begin to look more well-organized and eye-pleasing, rather than a chaotic mess.

● Diagonal lines and circles
A diagonal line running through the frame’s center with 2 circles, one on each side, is a terrific layout shape that helps balance your overall flat lay image. Hare, a few main objects form a diagonal line while 2 other circular objects help to balance the remaining frame.

● Spiral or circular placement flat lay
This interesting rule of composition makes your viewers’ eyes embark on a journey throughout the entire frame.
● Triangular placement flat lay
Choose any 3 objects in a primary order and position them in your phone in trigonometry. The triangular placement flat lay is one of the most stable structures which never gets boring.

8. Experiment with layers
Layering is an excellent approach to add a bit of visual appeal to your photos. For instance, you can layer one plate over another or set a dish on top of a tray. Or, add fabrics like parchment paper, burlap, crumpled napkin - anything that can add a bit of depth and layer to your flat lays.
Hand towels, cutting boards, magazines, vintage books, and sheets of colored paper are some other items that can create fantastic flat lay background layers.

Purchasing the Right Equipment for Photographing and Shooting Flat Lays
The most essential items you’ll need for photographing and shooting flat lays include an excellent light source and an effective way to hold your camera or phone steadily over the objects you shoot.
1. Invest In A Good Tripod Or Phone Stand
You can take flat lay shots quite simply by holding your camera or phone over an arrangement of carefully laid out items on a flat surface or the floor. However, it can be a challenge to keep your phone or camera entirely level and still.
A camera or phone tripod that can face downwards with a slight bubble level can help you take excellent flat lay shots, but this could be a bulky setup. But if you shoot all your flat lays via a smartphone, then you definitely need an all-in-one content creator tool in a box-like Olivia.
Capture Your Flat Lay Photos and Videos with Olivia
Olivia is the perfect content creation equipment for your flat lay photo sessions and product videos. It is simple and compact, giving you the ultimate setup for filming the most awe-inspiring and dreamy flat lay photos and videos that’ll up your social media and blog game.
- Olivia is the perfect tool that allows you to take easy overhead shots and provides multi-angle filming with a complete 360-degree rotation and tilt.
- This phone holder features a locking mechanism that ensures all your angled shots are secure.
- It is ideal for capturing flat lay pics or videos of various themes, including arts and crafts, cooking, showcasing your collectibles, just to name a few.
- It has a wireless setup system along with a wireless Bluetooth remote for control.
- It has a double-sided panoramic view, 7 fun light modes, 3 color temperatures, and 100 LED lamp-setup.
Complete all your high-angle, flat-lay photo and video shoots using the incredible, multi-function Olivia all-in-one content creator tool. You can easily pack this foldable mobile stand in your backpack and carry it anywhere with you. You can shop for the Olivia all-in-one content creator tool at Papparazo.

2. Adjust Your Light
The time of day can be a huge factor in your choice for the photoshoot based on where your windows are located. Whenever it’s possible, try setting up your flat lays near a window. Use a reflector or a bounce board across from your window to direct the natural light towards the flat lay setup.
If you don’t get adequate natural light from the windows, you can use artificial lights and tilt them down diagonally towards your flat lay arrangement. Soften this light using a diffuser, and keep a reflector or bounce board across from the setup to get even lighting.
Ring lighting or LEDs offer you flexibility and consistency in lighting. In addition, you can take advantage of the newest feature addition to Olivia products - a photo light box. There’s no need to wait for the sun to rise or stop when it sets. Instead, you can do your product photography any time of the day.
3. Get a Cable or Tethering App
Control your camera from a mobile phone or laptop with a physical cable or a digital tethering app. You can easily adjust your camera or phone settings and view your flat lay image results without the need to take your phone or camera off its stand or tripod. And Olivia products even come with a Bluetooth remote that provides you the ease of taking photos and videos.
4. Use the Right Camera Lenses and Features
Make sure to enable the grid guide on your smartphone or camera and align the most essential items on the grid’s crosshairs. This aids you in laying out your entire composition. Using the right lens, you can effectively capture your whole flat lay arrangement without any distortions.
Dive In and Start Photographing
Initiate this fun photography style and start brainstorming to create unique and interesting story ideas and gather all the props and inspirations you can. When it comes to flat lay photography and video shoots, the possibilities are endless.
You have ample room to create, and there are so many ways you can try out this photography style. So, what are you waiting for? Just follow your heart and imagination and see what interesting stories you can tell with just a handful of simple elements.